I’ll be blogging at The Decisive Cook. I hope you’ll follow me! Stop by and say hi.

Thursday, May 23, 2013
Tuesday, May 7, 2013
Double Chocolate Sorbet
A cooking extravaganza took place in my kitchen last weekend. I enjoyed every minute of it... well, almost every minute. I’m not a big fan of the clean-up aspect of creating a large meal.
Our friends and neighbors, Pete, Joey and Alice, were our dinner guests on Saturday night. Alice is almost two, and having her at our dinner table was a delight. It brought back so many memories of when my daughter was that age. Even though I did not make specific kid food for her, she ate everything with gusto, including basil pesto, panko-crusted salmon, even a bit of the baby greens salad with goat cheese and cranberries.
It was a warm day, around 85 degrees, which in Portland in May, is unusual, and downright hot! Some kind of frozen dessert was in order, so I chose a chocolate sorbet. My husband also requested his new favorite lemon pie, so I whipped up one of those too.
Do you love chocolate? Do you have an ice cream maker? Yes? Then you need to make this incredibly chocolatey sorbet right away. If you love chocolate, but do not have an ice cream maker, you will need to buy one or borrow one from a friend. This dessert requires this tool to create the proper consistency. Any inexpensive ice cream maker will do.
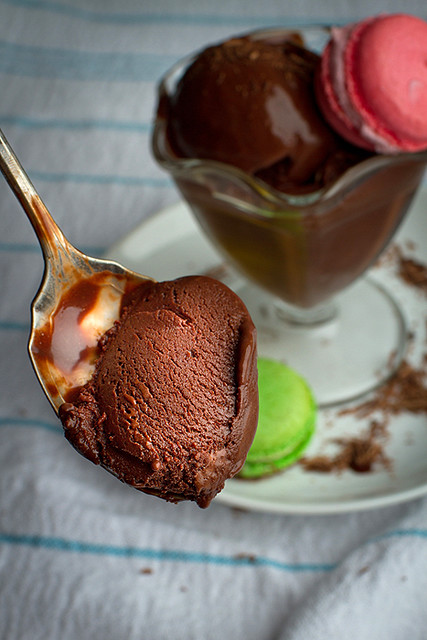
This dessert is exclusively for chocolate lovers. The only thing you’ll taste when you bite into it is chocolate. But, hey, it is light in caloric content (unless you eat the whole quart), and it’s gluten-free!

Double Chocolate Sorbet
Makes 1 small quart
Adapted from The Perfect Scoop
PRINTABLE RECIPE
2 1/4 cups water
1 cup sugar
3/4 cup unsweetened Dutch-process cocoa powder
1/4 teaspoon sea salt
6 ounces bittersweet or semisweet chocolate, chopped
1/2 teaspoon vanilla extract
In a large saucepan, whisk together 1 1/2 cups of the water with the sugar, cocoa powder, and salt. Bring to a boil, whisking frequently. Let it boil, continuing to whisk let the mixture boil for about 45 seconds.
Remove from the heat and stir in the chocolate until it’s melted. Then stir in the vanilla extract and the remaining 3/4 cup of water. Chill the mixture thoroughly. I covered it and placed it in the fridge for the night. Then place the chilled mix into your ice cream maker, and run it for about 25 minutes. Remove from the ice cream maker and place it into a sealed container. Freeze for 4-6 hours before serving.
When this dessert was placed in front of our youngest guest (topped with a colorful macaron and a dollop of whipped cream), her one word says it all: “Wow!”
Our friends and neighbors, Pete, Joey and Alice, were our dinner guests on Saturday night. Alice is almost two, and having her at our dinner table was a delight. It brought back so many memories of when my daughter was that age. Even though I did not make specific kid food for her, she ate everything with gusto, including basil pesto, panko-crusted salmon, even a bit of the baby greens salad with goat cheese and cranberries.
It was a warm day, around 85 degrees, which in Portland in May, is unusual, and downright hot! Some kind of frozen dessert was in order, so I chose a chocolate sorbet. My husband also requested his new favorite lemon pie, so I whipped up one of those too.
Do you love chocolate? Do you have an ice cream maker? Yes? Then you need to make this incredibly chocolatey sorbet right away. If you love chocolate, but do not have an ice cream maker, you will need to buy one or borrow one from a friend. This dessert requires this tool to create the proper consistency. Any inexpensive ice cream maker will do.
This dessert is exclusively for chocolate lovers. The only thing you’ll taste when you bite into it is chocolate. But, hey, it is light in caloric content (unless you eat the whole quart), and it’s gluten-free!
Double Chocolate Sorbet
Makes 1 small quart
Adapted from The Perfect Scoop
PRINTABLE RECIPE
2 1/4 cups water
1 cup sugar
3/4 cup unsweetened Dutch-process cocoa powder
1/4 teaspoon sea salt
6 ounces bittersweet or semisweet chocolate, chopped
1/2 teaspoon vanilla extract
In a large saucepan, whisk together 1 1/2 cups of the water with the sugar, cocoa powder, and salt. Bring to a boil, whisking frequently. Let it boil, continuing to whisk let the mixture boil for about 45 seconds.
Remove from the heat and stir in the chocolate until it’s melted. Then stir in the vanilla extract and the remaining 3/4 cup of water. Chill the mixture thoroughly. I covered it and placed it in the fridge for the night. Then place the chilled mix into your ice cream maker, and run it for about 25 minutes. Remove from the ice cream maker and place it into a sealed container. Freeze for 4-6 hours before serving.
When this dessert was placed in front of our youngest guest (topped with a colorful macaron and a dollop of whipped cream), her one word says it all: “Wow!”
Monday, April 29, 2013
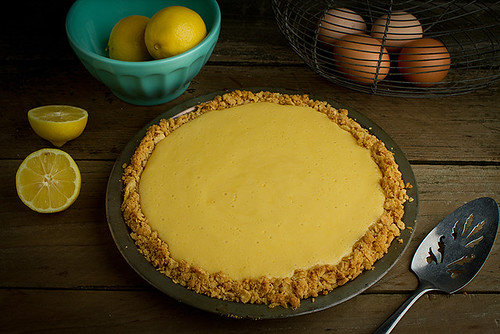
Atlantic Coast Lemon Pie
When I first heard about this pie, I had to pull off the road.
NPR’s ‘All Things Considered’ was on the radio. They were airing a story from food blogger Katie Workman, creator of Mom100 blog, and author of The Mom100 Cookbook: 100 Recipes Every Mom Needs in Her Back Pocket. Apparently, while vacationing in North Carolina, Katie fell head over heels for a lemon pie.
I heard descriptions of the pie’s tangy sweetness — along with angry honking from the car behind me — while I scrambled to take notes on where to locate the recipe for this dreamy lemon pie.
If you’ve spent any time along the North Carolina coast, you may have already tasted something like this. The recipe Katie shares is from Bill Smith, chef of Crook’s Corner Cafe in Chapel Hill, North Carolina. This is Bill’s version of the lemon pie commonly served at seafood restaurants along the Carolina coast when he was growing up.

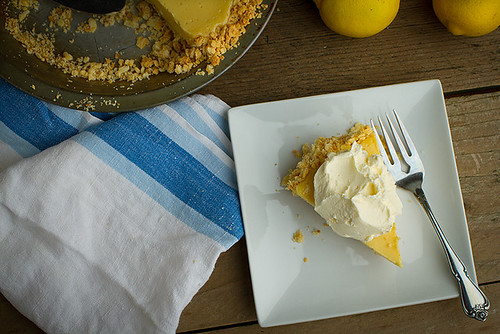
The fabulousness of this pie is not in any one ingredient, but rather the combination of a thick, crunchy, sweet and salty crust, and the tangy sweetness of a custard-textured lemon filling. The fact that it’s way easier than any pie I’ve ever met, is also a plus. I took Katie’s advice, and served it with billowy whipped cream on top, but you could make a meringue out of the egg whites not used in the filling. I personally prefer the consistency and flavor of organic heavy whipping cream thank you.
Bill Smith’s Atlantic Beach Pie
PRINTABLE RECIPE
THE CRUST:
1 1/2 sleeves of saltine crackers
1/3 to 1/2 cup softened unsalted butter
3 tablespoons sugar
THE FILLING:
1 can (14 ounces) sweetened condensed milk
4 egg yolks
1/2 cup lemon or lime juice or a mix of the two
Fresh whipped cream and coarse sea salt for garnish
Preheat oven to 350 degrees. Crush the crackers finely, but not to dust. You can use a food processor or your hands. Add the sugar, then knead in the butter until the crumbs hold together like dough. Press into an 8 inch pie pan. Chill for 15 minutes, then bake for 18 minutes or until the crust colors a little.
While the crust is cooling (it doesn’t need to be cold), beat the egg yolks into the milk, then beat in the citrus juice. It is important to completely combine these ingredients. Pour into the shell and bake for 16 minutes until the filling has set. The pie needs to be completely cold to be sliced. Serve with fresh whipped cream and a sprinkling of sea salt.
I couldn’t help but think about how the lemon filling would taste with my homemade, butter crust. Maybe I could add a bit of fleur de sel, I thought. But when I mentioned this to my husband, he was quick to share his thoughts about how it’s the combination of textures and flavors that makes this pie as fabulous as it is. So, I guess I won’t mess with success!
Anyone else already familiar with this wicked-good pie from the East?
Anyone else already familiar with this wicked-good pie from the East?
Sunday, April 21, 2013
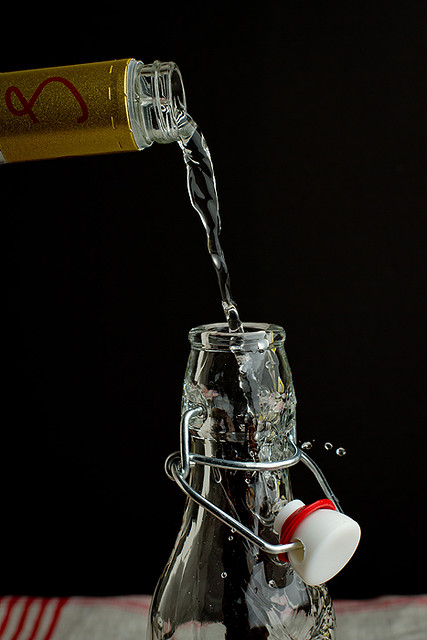
Simple, pure, homemade: Vanilla
When baking, I always strive to use the best ingredients possible, so after reading an article about Madagascar vanilla, I was ready to trade in my old Schilling vanilla for something more rich, and flavorful. But when doing a Google search for Madagascar vanilla, the price gave me pause. I learned that pure vanilla extract is the second most expensive spice in the world, with saffron in the number one spot. Pricing really good stuff, (around $20 for a 8oz bottle), pointed to one solution... its time to try my hand at making my own.
If you have a local spice store near you, I found it to be the best place to start. I stopped in at the Savory Spice Shop in Portland’s Sellwood neighborhood where I found a variety of beans at much lower prices than grocery stores or online. I decided on three different beans, all which, according to the authorities at Savory Spice, will create different flavored vanillas: Madagascar; Mexican; and Madagascar Organic. They were priced at $5-6.75 for a package of three. Add to that the price of a bottle of vodka, around $14, and hinged 8oz bottles (found at Storables), and you’re paying a little more than half price.
This turned out to be super easy. It only requires two ingredients, beans and vodka. The most difficult part? Patience. It takes about 3-4 months to brew.
 |
| Step One. Gather supplies. Vanilla beans (three beans for each 8oz bottle you’re planning to make). Premium vodka (or a flavorless vodka works too) 1/5 will make 3-8oz bottles of vanilla. Bottles. I found 8oz hinged stopper bottles at Storables for $2.95 each. (I really like these hinged bottles, but feel free to use any bottles in various sizes that seal tightly you like.) A funnel, or you can also just pour the vodka into a pitcher with a spout to make pouring into the bottles easier. |
 |
| Step Two. Wash the bottles you plan to use, and let them dry. |
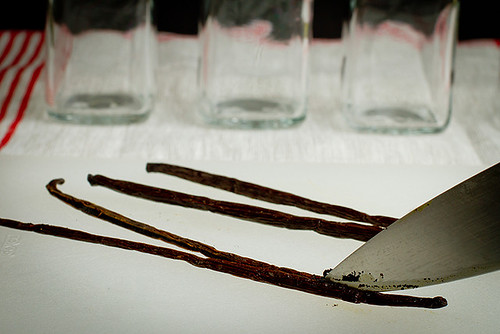 |
Step Three. Slice three of your vanilla beans in half lengthwise, and add them to a clean dry bottle. Continue until you’ve filled all your bottles with split vanilla beans.
|
 |
| Step Four. Carefully pour vodka into each bottle. Seal the bottles. Label them so you remember which bottle holds which flavor of bean. Store the filled bottles in a cool, dry, dark place, giving them a gentle shake every once in a while. |
 |
| Step Five. I attached these labels to keep track of the specific beans I used. Later I’ll design some permanent labels for them. |
That’s it! So easy!
Just leave the beans inside, and as you use the vanilla, add vodka to keep the bottle filled. You can also add a couple fresh beans to the mix and remove a couple every once in a while to keep your vanilla fresh.
Friday, April 12, 2013
More Dr. Oz green grub
I enjoyed last week’s smoothie based cleanse so much, I went on to try another Dr. Oz created diet this week. This 3-day formula claims that if you eat the same 3 meals, at about the same time each day, you will lose 3 pounds. The three meals required are specifically designed for weight loss. One of the ideas behind this diet, is to consume most of your calories early in the day when you’ll be most likely to expend them.
I like the idea of having my meals all planned out, but eating healthy does have its price. The pre-diet trip to the grocery store is not an inexpensive one. Whole, organic foods can translate to whole paycheck without much effort. I’m looking forward to summer when some of these veggies can be harvested from my own garden.
I talked my husband into participating in this diet with me. I thought it would be fun to have someone to commiserate with. I think he enjoyed knowing what he was having for each meal, and even more, having all his meals made for him.
Breakfast consists of protein (egg), dairy (reduced fat swiss cheese), monounsaturated fats and fiber (avocado), salsa (a plethora of vitamins), carbs (whole wheat English muffin). This was filling. I usually grab a piece of toast and slather it with peanut butter or almond butter with my coffee in the morning, so this is more than I usually eat before noon. I was full until after lunchtime.
Lunch is the largest meal of the day on this diet, and a bit too much food for me to consume at one time. Not sure who Dr. Oz had in mind on this one. It would have been the perfect amount if I had run a marathon in between breakfast and lunch. Unfortunately, I had not.
Dinner is a green smoothie. Fruit and vegetable drinks are a really good way to get plenty of fruits and veggies into your system. Imagine trying to chew as many fruits and vegetables as you can drink. Your body is able to digest them and absorb the nutrients so much easier in liquid form. If you tried the green lunch smoothie I posted last week, and found it to be somewhat hard to swallow, you’ll love this one. Really! Trust me on this. The addition of banana and vanilla whey protein powder make it creamy and delicious. If I didn’t know what was in it, and I had my eyes closed while drinking it, I never would have guessed it was green.
Side: Baked Sweet Potato Fries
Thoughts and tips:
I like the idea of having my meals all planned out, but eating healthy does have its price. The pre-diet trip to the grocery store is not an inexpensive one. Whole, organic foods can translate to whole paycheck without much effort. I’m looking forward to summer when some of these veggies can be harvested from my own garden.
I talked my husband into participating in this diet with me. I thought it would be fun to have someone to commiserate with. I think he enjoyed knowing what he was having for each meal, and even more, having all his meals made for him.
Breakfast consists of protein (egg), dairy (reduced fat swiss cheese), monounsaturated fats and fiber (avocado), salsa (a plethora of vitamins), carbs (whole wheat English muffin). This was filling. I usually grab a piece of toast and slather it with peanut butter or almond butter with my coffee in the morning, so this is more than I usually eat before noon. I was full until after lunchtime.
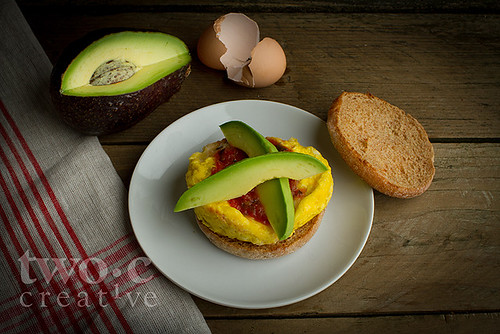 |
| Did you know that avocado is a superfood? Two-thirds of the fats in avocados are monounsaturated, which helps lower bad cholesterol and maintain, or increase good cholesterol. They’re a rich source of vitamin E too, which is a powerful antioxidant. A two-tablespoon serving contains 2 grams of fiber and an entire fruit contains about 10 grams. |
Lunch is the largest meal of the day on this diet, and a bit too much food for me to consume at one time. Not sure who Dr. Oz had in mind on this one. It would have been the perfect amount if I had run a marathon in between breakfast and lunch. Unfortunately, I had not.
 |
| I opted for one bean burger instead of two. I’ll give you specifics on the nutritional values to look for when purchasing these prepackaged veggie burgers a bit later. |
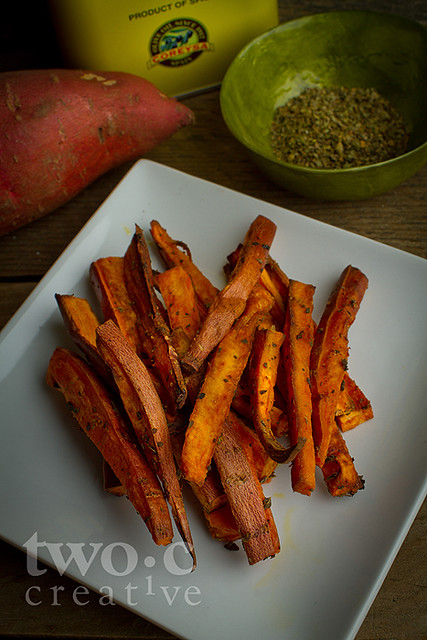 |
| A side of sweet potato fries go with lunch. They were my favorite part! Sweet potato (or yam), sliced, drizzled with olive oil, sprinkled with oregano, baked until crispy. |
Dinner is a green smoothie. Fruit and vegetable drinks are a really good way to get plenty of fruits and veggies into your system. Imagine trying to chew as many fruits and vegetables as you can drink. Your body is able to digest them and absorb the nutrients so much easier in liquid form. If you tried the green lunch smoothie I posted last week, and found it to be somewhat hard to swallow, you’ll love this one. Really! Trust me on this. The addition of banana and vanilla whey protein powder make it creamy and delicious. If I didn’t know what was in it, and I had my eyes closed while drinking it, I never would have guessed it was green.
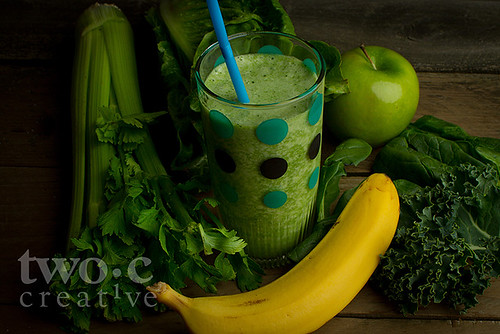 |
| You should consume the least amount of calories at dinner time. This shake will burn fat and help to build lean muscle. The recipe makes about 4 cups, which was about 2 cups too much. It really was delicious, but I was too full to finish it, so on subsequent nights, my hubby and I shared the single serving amount. |
1 egg
1/2 tbsp olive oil
1 slice of reduced fat Swiss cheese
2 slices avocado
1 tbsp medium salsa
1 whole wheat English muffin
Directions
Lightly oil a small ramekin with some olive oil and crack an egg into it. Use a fork to scramble the egg a bit, or at least pierce the egg yolk so the egg won't explode. Ladle one tsp of salsa on top of egg and layer the cheese slice (folded in half) over it. Microwave on 50% power for 1 minute and 20 seconds (time may vary depending on strength of microwave). Carefully remove ramekin from microwave – ramekin may be hot, use potholders if necessary – and let sit a few minutes to settle. Run a small knife around the rim of the cooked egg and gently invert over the toasted muffin half. Top with the remaining 2 tsp of salsa, remaining olive oil and slices of avocado, and the top half of the muffin.
Lunch: Double Bean Burger
Ingredients
2 pre-made bean burgers (see note below)
Iceberg or butter lettuce (2 whole leaves)
1 portobello mushroom, sliced into 1/2 inch strips
1/2 yellow onion, sliced into rings
1/2 tbsp olive oil
DirectionsIceberg or butter lettuce (2 whole leaves)
1 portobello mushroom, sliced into 1/2 inch strips
1/2 yellow onion, sliced into rings
1/2 tbsp olive oil
When mushrooms are done, remove to a plate and add onions. Add half the oil to a large non-stick sauté pan and cook the mushrooms in one layer on medium heat, flipping over once until nicely browned on both sides. Add remaining oil and cook the onions until softened and browned, about 10 minutes. Add back mushrooms and stir together.
Buying Guide for Bean Burgers:
- Beans must be listed in the first two ingredients
- 150 calories or less per serving
- 5 grams fat or less per serving
- 400 mg sodium or less per serving
Ingredients
1/2 sweet potato, skin on
1/2 tbsp olive oil
1/2 tbsp dried oregano
Directions
Pre-heat oven to 425°F. Scrub potato under cold water until clean. Cut potato in half and save for later use. Cut potato half into long wedges. In a bowl, combine potato wedges, olive oil and dried oregano. Spread on a rimmed cookie sheet and bake until browned and cooked through, about 30 minutes, turning halfway through.
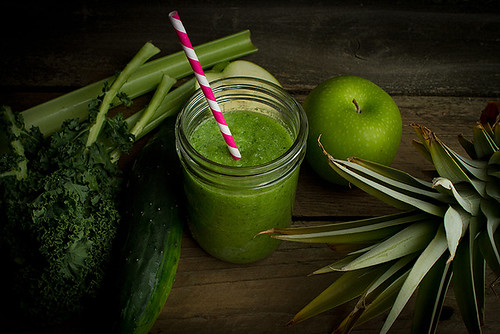
Dinner: Lean Green Supper Shake
Ingredients
3 cups of green veggies – kale, spinach, chopped romaine, celery
1 green apple
2 cups of ice
1/2 banana
1 scoop vanilla whey powder
3/4 cup of unsweetened almond milk
Directions
Combine all in a blender and blend well. Pour into glass, garnish with a celery stick or slices of green apple.
• The almond milk selection out there is confusing. Choose one that’s unsweetened. I liked Blue Diamond brand. It’s available in two lines, sweetened and unsweetened. In each line they offer three flavors: original, vanilla and chocolate. I like the vanilla flavored, and since it wasn’t specified, you could go for the chocolate flavored.
• The selection of bean garden burgers is even more confusing. I found several, most of which did not fit the criteria for Dr. Oz’s buying guide. I picked up several brands and mixed and matched to get to where they needed to be in terms of fat, calories and sodium intake.
• I loved the green shake! It’s rich and creamy!
• The baked sweet potato fries are a great snack!
• The meals are substantial. I gained a pound after the first day. You can alter the amounts to suit your own appetite.
• Just to be clear, I am volunteering to do this Dr. Oz diet, but I am not affiliated with him, or anyone representing his ideas in any way.
• After the diet, my weight was exactly the same as when I started. I can’t recommend this for weight loss, but it’s great for eating healthy meals, and I’ll be saving the green drink and sweet potato fries recipes for future use.
Thursday, April 4, 2013
Dr. Oz 3-day Detox Cleanse, from my point of view
We spent last week at the Oregon coast. Games were played, walks on the beach, movie watching, a beach bonfire, ball throwing sessions for doggies, and a trip to the Oregon Coast Aquarium... and lots of eating. What is it about the ocean air that makes us want to eat, eat, and eat some more? The sun went down, it must be time for ice cream and cookies. Never mind the fact that I’d already consumed too many M&M’s to count, Guinness, and a large mango smoothie topped with whipped cream earlier in the day. Not to mention the breakfast, lunch and dinner we consumed in-between snacks.
Time to cleanse! I’ve never participated in anything like this before, but then I have not been the age I am now, with a brand new tendency to collect a few extra pounds around my mid section.
Recently, a friend told me about her 25 pound weight loss through a Dr. Oz diet that begins with a 3-day smoothie based cleanse. The initial cleanse claims to reboot your system and balance hormones. Sounds promising. I like the fact that everything can be found at a local grocery store, and it’s all recognizable, healthy, simple food.
Just to be clear, I am volunteering to do this Dr. Oz developed cleanse, but I am not affiliated with him, or anyone representing his ideas in any way. I brought this challenge on completely unaided. This cleanse was developed several months ago, and many people have done it and survived, maybe even thrived, I don’t know. All I know is that I really like the idea of eating super healthy for a few days.


Graphic from The Dr. Oz Show web site
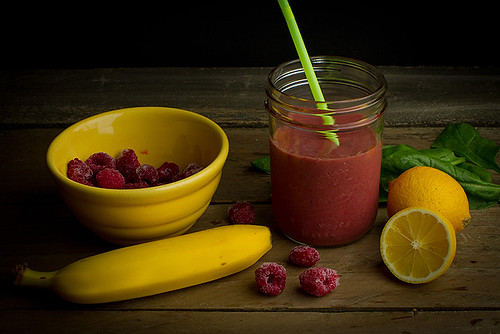
Day 1: I got up extra early to create the breakfast concoction that would kick start my Monday. While sipping a hot green tea with lemon, I dropped ingredients into the blender one by one... Raspberries, banana, spinach, almond butter, lemon juice, flax seed, and cold water. Yum! This made one full glass of goodness. Just before I finished it, I took a multivitamin with the final sip and followed that with about three ounces of a strawberry flavored probiotic supplement yogurt-like drink. So far, so good!
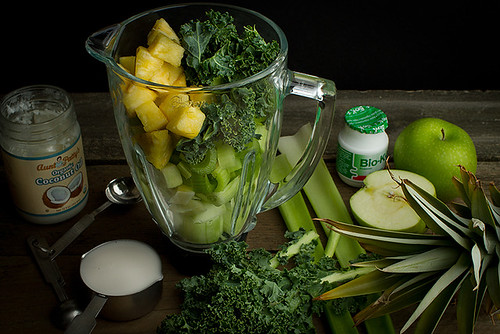
At 11:30 I started making my lunch. I’ve never met a vegetable I didn’t like, but that was before I met celery and cucumber blended together. I peeled the cucumber and removed the seeds, peeled the skin off the apple and removed the core. Chopped up four celery stalks. Cut up a whole pineapple, removed the core, cut it into chunks, and placed the remainder in the freezer. It took me exactly two hours to choke this smoothie down. This made two large glasses full (or about 4 cups), which was a glass and a half too much. This green concoction was followed by another multivitamin and an Omego 3 supplement.
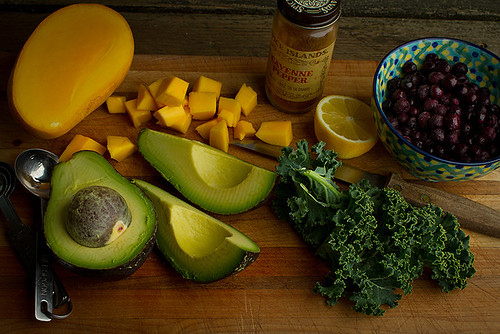
I chose the breakfast smoothie as my snack, since it was by far the best out of two. By 5:30 I was starving, but I managed to put off drinking the dinner smoothie until around 7pm. So far, the dinner drink was my favorite. The combination of mango, blueberries, avocado, kale, coconut water, and a bit of spice from the cayenne, was good.
I ended the day with a luxurious 30+ minute extra hot Epsom salt and lavender oil bath... ahhhhhhhh.
 |
| BREAKFAST |
 |
| LUNCH |
 |
| DINNER |
After I consumed the morning smoothie, vitamin and probiotic, I got to work putting together the lunch smoothie. It’s so large, and my least favorite, so I wanted to take a little of it with me to drink on the way to yoga. I figured this would give me a head start on tackling this green monster, which consists of more chewing than drinking. Note: Keeping it as cold as possible helps a lot.
I doubled the recipe for the dinner smoothie and drank half of it for the snack portion and the other half for dinner. I’m really craving real food, but I’m sure I can handle one more day of this. I had to make a trip to the grocery store tonight for a few more ingredients I’m running short on. That was torture. When did grocery stores start with all the samples?
Day 3: I had a slight headache in the morning again, but I guess that’s to be expected since I haven’t had any caffeine since Sunday. After drinking a cup of green tea on my morning commute, the headache magically disappeared. I drank the morning drink on the way to a meeting. I’m starting to get used to this to-go food in a cup.
By lunchtime I was starving, but not looking forward to having that green drink. Much to my surprise, it actually tasted decent today. I’m not sure why, there was no difference between today’s lunch drink and yesterday’s or the day before that, but the flavors tasted better. Acquired taste? This reminds me of when I was in my 20’s and wanted to be able to order a simple drink in a bar. I forced myself to like gin so I could order a dry martini up with two olives. Ha! I felt so grown up. Now I’ve taken another maturation step and acquired a taste for celery and cucumber!
The dinner drink was again fabulous, but left me wanting hot, chewable food. I was really looking forward to morning, planning my breakfast of a farm fresh egg and... coffee.
Thoughts and tips:
• Buy the best fruits and veggies you can afford. I purchased everything at my local New Seasons. They were very helpful with the vitamins and supplements I needed too. Everything I used was fresh, locally grown and organic, which makes a difference for me psychologically as I’m consuming it. It’s so comforting to know you’re putting only good things in your body.
• I am a protein addict. I don’t feel right unless I have regular protein based foods, but I never felt deprived during the 3-day cleanse. Each drink has some form of protein in it. I never thought one tablespoon of almond butter would be enough protein for breakfast, but it seemed to be fine.
• I am a protein addict. I don’t feel right unless I have regular protein based foods, but I never felt deprived during the 3-day cleanse. Each drink has some form of protein in it. I never thought one tablespoon of almond butter would be enough protein for breakfast, but it seemed to be fine.
• Keep the drinks cold. It really helps to have at least one item in each drink that’s frozen when you put it in the blender. I purchased fresh frozen blueberries, which added a lot of sweetness to the evening drink. After cutting up a whole pineapple, I froze the chunks in a sealed container. The raspberries I used were already in my freezer from our last crop. Keeping these drinks ice cold helps their palatability immensely.
• Drink plenty of water throughout the day. This will help keep you hydrated and keep things moving along.
• Stay close to a bathroom. Make sure you are relatively close to a bathroom the whole time you’re on this cleanse. All that liquid has to come out, not to mention how these fiber-filled smoothies clean out your colon.
• You don’t need an expensive blender to make these drinks. The glass container on our old 15-year blender broke a month ago, so we borrowed an inexpensive one from my Mom. It worked fine.
• Coconut oil and almond butter. The benefits of these fats are astounding, and they became my friends during the cleanse. But remember, these are good in moderation, because they are some of the only sources of protein you’re consuming during the cleanse. Don’t go adding these in large quantities to your existing diet, they’ll definitely make you pack on pounds.
• Coconut oil and almond butter. The benefits of these fats are astounding, and they became my friends during the cleanse. But remember, these are good in moderation, because they are some of the only sources of protein you’re consuming during the cleanse. Don’t go adding these in large quantities to your existing diet, they’ll definitely make you pack on pounds.
• Remove the peeling, or not. The recipes don’t say anything about whether certain fruits and vegetables should be peeled. I did peel the apple, cucumber, and lime, but I suppose if you’re feeling adventurous you could leave them intact. I find those parts too bitter and tough for my taste.
• My cravings have been curbed. Now that I’ve completed the cleanse, my cravings for anything remotely unhealthy have been eliminated.
• Questions? You can ask me anything about the cleanse you want. I might even know the answer.
Enjoy the cleanse! I’m going to go chew on something now.
• My cravings have been curbed. Now that I’ve completed the cleanse, my cravings for anything remotely unhealthy have been eliminated.
• Questions? You can ask me anything about the cleanse you want. I might even know the answer.
Enjoy the cleanse! I’m going to go chew on something now.
Tuesday, March 26, 2013
Soup's On!

Last week I was ready to fire up the barbecue, raise the shade umbrella, clean the layer of green scum from the outdoor furniture, and let the outdoor dining season begin. The month of March has fooled me before, and this Portland spring was no exception. Rain, along with cold temperatures, returned as quickly as they had briefly departed.
Because the soup days of winter are not yet over, I want to share one of my favorite soups with you, my dear readers. This is the kind of soup that can easily be thrown together without much effort. You may already have many of its necessary ingredients on hand.

Chicken and Wild Rice Soup
INGREDIENTS:
1 (6-ounce) box long-grain and wild rice mix (such as Uncle Ben's)
1 tablespoon olive oil
1 tablespoon olive oil
1 1/2 cups chopped red onion
1 cup chopped celery
1 cup chopped carrot
2 garlic cloves, chopped
1 (8-ounce) package mushrooms, halved
1/4 cup all-purpose flour
1/2 teaspoon dried tarragon
1/4 teaspoon dried thyme
2 cups water
2 tablespoons dry sherry
2 (15.75-ounce) cans fat-free, less-sodium chicken broth
1 (12-ounce) can fat-free evaporated milk
3 cups shredded roasted skinless chicken
DIRECTIONS:
• Prepare rice according to package directions; set aside. Roast 2-3 large chicken breasts; shred and chill.
• In a large Dutch oven, heat 1 tablespoon of olive oil over medium-high heat. Add chopped onion and next 4 ingredients (onion through mushrooms), and sauté for 6 minutes, or until the onion is tender. Lightly spoon the flour into a dry measuring cup, and level with a knife. Stir the flour, tarragon, and thyme into the onion mixture, and cook for 1 minute, stirring frequently. Add 2 cups of water, sherry, broth, and evaporated milk; bring mixture to a boil. Reduce heat, and simmer for 20 minutes or until slightly thick. Stir in cooked rice and chicken; cook for 10 minutes or until thoroughly heated. Great with a loaf of warm, buttered artisan bread for dipping.
Subscribe to:
Posts (Atom)